Managing Assignments
Creating an assignment
The following is the procedure for creating an assignment:
Log in with system manager or system administrator rights.
From the menu, click on “Assignment > Create assignment” to display the create assignment screen.
Enter the required fields and click on the “Save” button.
Hint
Turn on the “Add manager of placement of assignment to edit and tabulate assignment” check box to enable the manager and teacher to view and edit the created assignment.
Method for collectively processing assignments
Please find below the procedure for collectively registering, updating, or deleting assignments.
Log in with system administrator or system manager rights.
Click “Assignment > Collectively process” of the menu, in order to display an input form for collectively processing assignments.
Prepare a CSV-format file and edit and make a file for collective processing.
Hit the button “Select a file”, and select the CSV file that has been created.
Hit the button “Send” in order to enable a collective processing.
Hint
In a case of an error being committed in making a file for collective processing, an error cause is indicated in the following page. Review and correct the file contents. Then, revert to the previous page and register again.
Hint
A CSV file that can be downloaded in the page of assignment list can be used as a file for collective processing as well. (Note that the file needs to be corrected appropriately.)
Method for specifying implementation conditions for assignments
Please find below the procedure for specifying implementation conditions for assignments.
Log in using an account with privileges for editing assignments.
Click ‘Assignments’ and then ‘Assignment List’ at ‘Menu’ in order to display a page of Assignment List.
Click on the link ‘Edit’ at the right of each assignment in order to display a page for editing the assignment.
In order to assign specific conditions for implementing an assignment, click ‘Change’ after typing the conditions for implementing the assignment.
Attention
‘e-learning’, ‘Test’, ‘Questionnaire’, or ‘Assignment’ can only be specified as subjects for the conditions for implementing an assignment, to the extent that the same implementation destination as for the assignment is shared.
Hint
Move from an information page of ‘Program’, ‘Course’ or ‘Class’ to a ‘Page for specifying implementation conditions’. Collectively specifying implementation conditions for training materials is enabled, if the same implementation destination is shared.
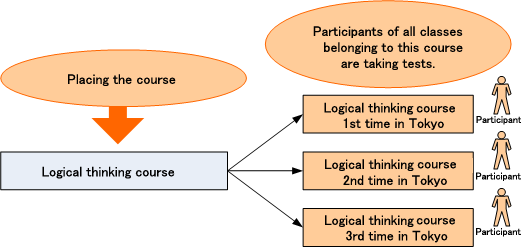
Scope of an assignment
The scope of an assignment depends on the specified course.
If a program is selected for “Executed place of assignment”, the assignment will be given for all courses in that program.
If a course is selected for “Executed place of assignment”, the assignment will be given for all classes in that course.
Conditions for managing courses
The system administrator can manage all assignments.
To enable the course manager or teacher to manage the created assignment, turn on the “Add manager of placement of assignment (includes the teacher and assistant if it is a class) to edit and tabulate assignment” check box in the create assignment screen.
The class manager can view the assignment submission status for his/her managed classes belonging to programs or courses in the assignment scope.
Viewing the submission status of assignment reports
The following is the procedure for viewing the submission status of assignment reports:
Login as a user with assignment managing rights.
From the menu, click on “Assignment > List of assignments” to display the List of assignments screen.
Click on the “Submitting situation” link to the right of each assignment to display the List of submitting situation of assignment report screen.
You can view each participant’s submission status in the “List of submission status” area.
Scoring assignments for multiple participants at once
The following is the procedure for scoring assignments for multiple participants at once:
Login as a user with assignment managing rights.
From the menu, click on “Assignment > List of assignments” to display the List of assignments screen.
Click on the “Submitting situation” link to the right of each assignment to display the List of submitting situation of assignment report screen.
In the [List of submission status] area, enter the score for each participant in the [Update score] field and click on the “Update scores” button.
Hint
You can download a file with reports from all participants from the List of submitting situation of assignment report screen.
Scoring an assignment for a participant
The following is the procedure for scoring assignments for each participant:
Login as a user with assignment managing rights.
From the menu, click on “Assignment > List of assignments” to display the List of assignments screen.
Click on the “Submitting situation” link to the right of each assignment to display the List of submitting situation of assignment report screen.
In the [List of submission status] area, click on the participant’s name to display the Assignment information screen.
In the [Score of submitted report] area, enter the score in the [Result of score] column and click on the “Update score” button.
To create email sending schedule to the assignment
The following is the procedure for creating email sending schedule to the assignment
Log in with system manager or system administrator rights.
On the menu, click “Assignment > List of assignments” to display the assignment list screen.
Click one of the “Submitting situation” links to the right of each of the survey items to display the list of submitting situation of assignment report screen.
Click the “Configure the schedule of sending email” links to display the “Register schedule of sending email” screen.
After entering the required items, click “Add a schedule sending start mail” or “Add a schedule sending remind mail” link to create the “email sending schedule”.