Managing tests
Tests and test templates
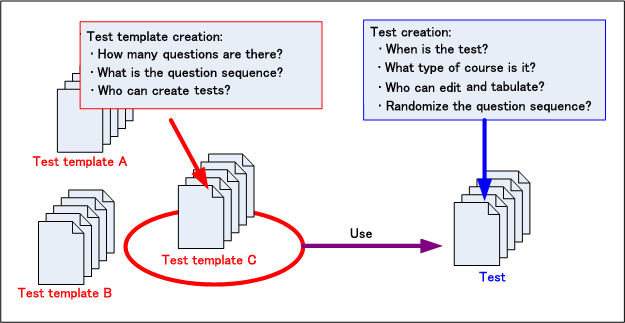
With this system, tests are implemented by creating test templates and tests. A test template is a collection of questions that can be reused in different tests. A test defines questions and answers to be used.
To create a test template
The following is the procedure for creating a test template.
Log in with system manager or system administrator rights.
On the menu, click “Test > Create test template” to display the test template creation screen.
After entering the required items, click the “Register the template and move to the screen for creating questions” button to display the question editing screen.
Enter the required items and register questions to register to the test template.
Hint
Questions can also be batch registered and updated. Click “Batch process questions” to access the registration and update method.
Conditions for using a test template
System administrator is able to edit and tabulate all test template.
In order to make it possible for a course manager to be able to use a created test template, select training (program, course, class) in the “Test creator” column on the test template creation screen that includes the manager you want to be able to create tests. The selected course manager will be able to create tests using the test template.
To create a test
The following is the procedure for creating a test.
Log in with system manager or system administrator rights.
On the menu, click “Test > Create” to display the test creation screen.
After entering the required items, click “Register” to create the test.
Hint
If you want to allocate points for questions, select “Mark by score” in “Requirement to pass” and allocate 0 or more points for “Points” column of each question. If you select “Mark by score”, “Configure presenting questions randomly” is disabled.
Attention
If you change allotment of points, submitted answers will be affected by the change. Accordingly, results of the submitted answers may change.
Attention
If you add a question to examination after submitting the answers, the results of answers that have been submitted is decided based on questions except for the added question. Therefore, even if a question is added, acceptance or rejection of the submitted test will not change.
Attention
If you change requirement to pass from “Mark by score” to “Mark by percentage of correct answers”, or from “Mark by percentage of correct answers” to “Mark by score”, submitted answers will be affected by the change. Accordingly, results of the submitted answers may change.
Hint
If you want the course manager and instructors to be able to edit and tabulate the test you are creating, select the “Specify relevant manager as editor and tabulator.” check box.
To specify precondition for a test
The following is the procedure for specifying precondition for a test.
Log in with an account that has test editing rights.
On the menu, click test List to display the test list screen.
Click one of the “Edit” links to the right of each of the test items to display the test editing screen.
After inputting the precondition for doing test, click “Apply” to apply them
Attention
A learning tool in the same place of the test can be specified as the precondition for doing it.
Hint
You can specify the precondition for all learning tool in the same place by accessing to the “Specify precondition” screen from “Program”,”Course”,or “Class information” screen.
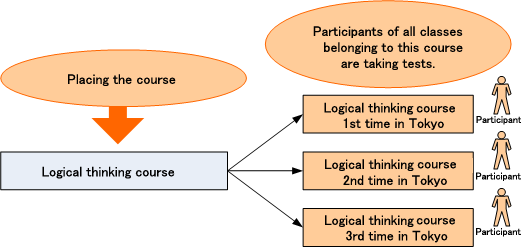
Scope of a test
The scope of a test depends on the specified course.
When a program is selected with “Test placement,” all of the courses assigned to that program are tested.
When a course is selected by “Test placement,” all of the classes assigned to that course are tested.
Conditions for managing tests
System administrator is able to edit and tabulate all tests.
If you want the course manager and instructors to be able to edit and access the test you are creating, select the “Specify a relevant manager as editor and tabulator” check box during test creation.
Class manager is able to tabulate the “e-learning”, if the managing class is belong to the placement of the test.
To access the test implementation status
The following is the procedure for accessing the test progress status.
Log in with system manager or system administrator rights.
On the menu, click “Test > Test list” to display the test list.
Click one of the “Tabulation” links to the right of each test to display the progress check screen.
You can check “Status of progress for each unit tabulated” “Status of progress for each participant” and “Status of progress for each organization” on the “Tabulation form.”
Hint
Test “Status of progress for each unit tabulated” “Status of progress for each participant” “Status of detail progress for each participant” and “Status of progress for each organization” can also be downloaded as a CSV file.
Attention
Even if the order of selections is configured as random, the downloaded alignment sequence of selections is ascending order of default order int the CSV file of “Status of detail progress for each participant”.
To create email sending schedule to the test
The following is the procedure for creating email sending schedule to the test
Log in with system manager or system administrator rights.
On the menu, click “Test > Test List” to display the test list screen.
Click one of the “Progress” links to the right of each of the test items to display the test progress status screen.
Click the “Configure the schedule of sending email” links to display the “Register schedule of sending email” screen.
After entering the required items, click “Add a schedule sending start mail”,”Add a schedule sending remind mail” or “Add a schedule sending failed mail” link to create the “email sending schedule”.