Managing “e-learning”
“e-learning” and its contents
Creating “e-learning” makes it possible for participants to learn the “Contents”. “e-learning” is a collection of contents. Various restrictions, as well as the placement, and duration can be specified for “e-learning”. The restrictions, placement, and duration specified for “e-learning” are applied for all of the contents registered to the “e-learning”. There are three types of content: normal contents, HTML contents, SCORM contents, and Video(Streaming).
Types of contents |
Description |
|---|---|
Normal contents |
|
HTML contents |
|
SCORM contents |
|
Video(Streaming) 2 |
|
Hint
Assigning ‘Career Paths’ to e-learning courses helps learners easily find what is suitable for them. Assigning career paths to e-learning courses enables users to locate a specific e-learning course by specifying a career path.
To create “e-learning”
The following is the procedure for creating “e-learning” contents.
Log in with system manager or system administrator rights.
On the menu, click “e-learning > Create” to display the “e-learning” creation screen.
After entering the required items, click “Register” to create the “e-learning”.
Hint
If you want the course manager and instructors to be able to edit and tabulate the “e-learning” you are creating, select the “Specify relevant manager as editor and tabulator.” check box.
Hint
Click the ‘Set a career path’ link for e-learning courses to display the form. Select a career path in the form and click the ‘Set’ button to assign it to the e-learning courses.
Attention
If you are registering HTML contents, you need to select the “Register as HTML contents” check box and upload a file that satisfies the HTML contents conditions described under “e-learning” and its contents.
Attention
Uploading a file that satisfies the SCORM contents conditions described under “e-learning” and its contents registers the file as SCORM contents automatically.
To edit “e-learning”
The following is the procedure for editing “e-learning”.
Log in with an account that has “e-learning” editing rights.
On the menu, click “e-learning > List” to display the “e-learning” list screen.
Click one of the “Edit” links to the right of each of the “e-learning” items to display the “e-learning” editing screen.
After making the changes you want, click “Apply” to apply them.
Hint
The content which is specified prerequisite is restricted learning, if the target prerequisite content is not completed.
Hint
Click the ‘Set a career path’ link for e-learning courses to display the form. Select a career path in the form and click the ‘Set’ button to assign it to the e-learning courses.
Attention
When updating HTML contents, you must register a file that satisfies the HTML contents conditions described under “e-learning” and its contents.
Attention
When updating SCORM contents, all of the following conditions must be met.
SCORM contents must satisfy the SCORM contents conditions described under “e-learning” and its contents.
The number of SCOs of the original SCORM contents and the number of SCOs of the newly updated SCORM contents must match.
The number of ASSETs of the original SCORM contents and the number of ASSETs of the newly updated SCORM contents must match.
All of the SCO IDs of the original SCORM contents and the SCO IDs of the newly updated SCORM contents must match.
All of the ASSET IDs of the original SCORM contents and the ASSET IDs of the newly updated SCORM contents must match.
Attention
When updateing video contents, the progress of learners who are not incomplete the video will be initialized.
To copy “e-learning”
The following is the procedure for copying “e-learning”.
Log in with an account that has “e-learning” editing rights.
On the menu, click “e-learning > List” to display the “e-learning” list screen.
Click the “Copy” link to the bottom of the “e-learning” item that you want to copy.
There are items copied and items not copied. The details are as follows.
Name of e-learning 3
Subscription
Contents (Normal contents, HTML contents, SCORM contents)
Shared contents (Normal contents, HTML contents, SCORM contents)
Video contents
Title of each contents
Subscription of each contents
Prerequisite between contents
Compatible view of each SCORM contents
Placement of the “e-learning”
Settings for publishing 4
Start time, End time
The precondition for doing the “e-learning”
- 3
“[Copy]” is added to the beginning of the e-learning name of the copied “e-learning”.
- 4
After copying, the settings for publishing of the copied “e-learning” is set to “Do not execute”. To publish the “e-learning”, change the settings for publishing to “Submit” on “e-learning” edit screen.
Hint
After copying the “e-learning”, change the “e-learning” information on “e-learning” edit screen.
Hint
As for shared contents and video contents, the information of specified target is copied. The original files of the contents are not copied. As for contents other than shared contents or video contents, the original files of the contents are copied.
Attention
The progress of the “e-learning” is not copied.
To specify precondition for “e-learning”
The following is the procedure for specifying precondition for “e-learning”.
Log in with an account that has “e-learning” editing rights.
On the menu, click test List to display the “e-learning” list screen.
Click one of the “Edit” links to the right of each of the test items to display the “e-learning” editing screen.
After inputing the precondition for doing “e-learning”, click “Apply” to apply them
Attention
A learning tool in the same place of “e-learning” can be specified as the precondition for doing it.
Hint
You can specify the precondition for all learning tool in the same place by accessing to the “Specify precondition” screen from “Program”,”Course”,or “Class information” screen.
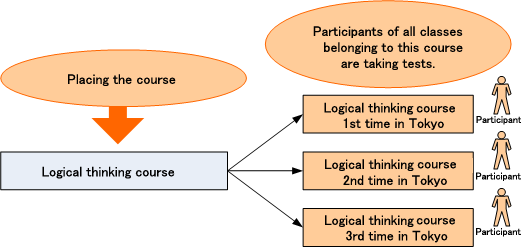
Scope of “e-learning”
The scope of “e-learning” depends on the specified course.
When a program is selected by “e-learning placement,” all of the courses assigned to that program are for “e-learning” implementation.
When a course is selected by “e-learning placement,” all of the classes assigned to that course are for “e-learning” implementation.
Conditions governing “e-learning” management
System administrator is able to edit and tabluate all “e-learning”.
If you want the course manager and instructors to be able to edit and tabulate the “e-learning” you create, select the “Specify relevant manager as editor and tabulator.” check box when creating the “e-learning”.
Class manager is able to tabluate the “e-learning”, if the managing class is belong to the placement of the “e-learning”.
To access the “e-learning” progress status
The following is the procedure for accessing the “e-learning” progress status.
Log in with system manager or system administrator rights.
On the menu, click “e-learning > List” to display the “e-learning” list screen.
Click one of the “Progress” links to the right of each of the “e-learning” items to display the “e-learning” progress status screen.
You can check the progress status of the “e-learning” at the bottom of the “Tabulation form”.
Hint
In the “e-learning” progress status screen, “Course start announcement email” and “Reminder email” can be sent.
To create email sending schedule to e-learning
The following is the procedure for creating email sending schedule to e-learning
Log in with system manager or system administrator rights.
On the menu, click “e-learning > List” to display the “e-learning” list screen.
Click one of the “Progress” links to the right of each of the “e-learning” items to display the “e-learning” progress status screen.
Click the “Configure the schedule of sending email” links to display the “Register schedule of sending email” screen.
After entering the required items, click “Add a schedule sending start mail” or “Add a schedule sending remind mail” link to create the “email sending schedule”.
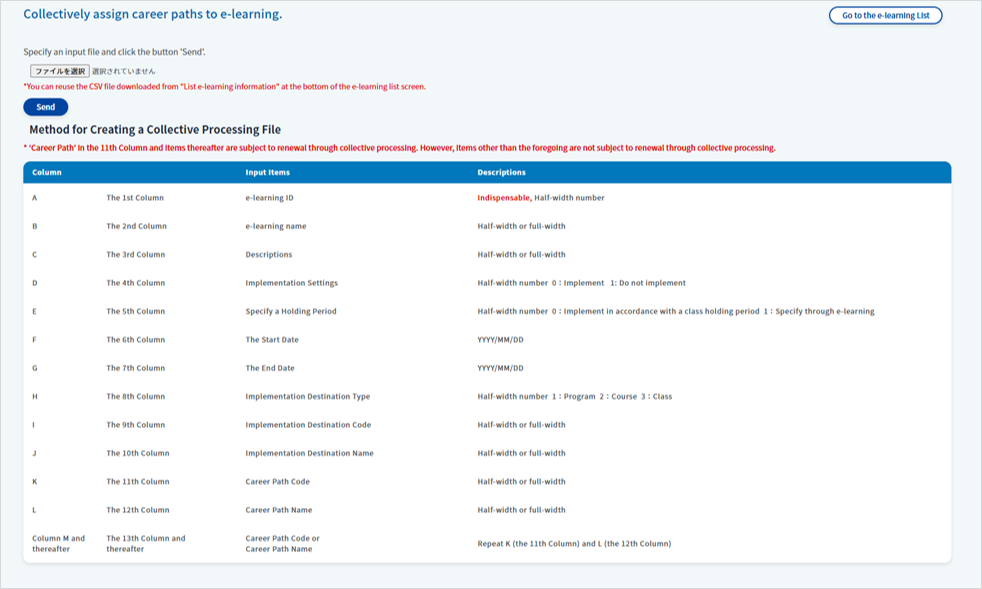
Method for Collectively Assigning Career Paths to e-learning Courses
See below for the procedure for collectively assigning career paths to e-learning courses.
Log in using an account authorized to edit e-learning courses.
Click ‘e-learning > e-learning List’ in the menu to display the list of e-learning courses.
Click the ‘Collectively assign career paths to e-learning’ to display the page for collectively assigning career paths to e-learning courses.
Prepare and format a CSV file for batch processing.
Click the ‘Select a file’ button to choose the created CSV file.
Click the ‘Send’ button to perform the batch processing.
Hint
If there are errors in the bulk processing file, the next page will display the error details. Review and correct the file, then return to the previous page and re-upload it.
To configure screen size of SCORM content
The following is the procedure for configuring screen size of SCORM content.
Log in with system manager right.
On the menu, click “e-learning > Screen config of SCORM content > Screen Size” to display the “Configure screen size of SCORM content” screen.
Edit screen size, and then click the “Update” button.
To Customize SCORM completion page
SCORM completion page is the page that appears when you have completed all the pages of SCORM content. By default, the standard message is displayed.
The following is the procedure for customizing SCORM completion page
Log in with system manager right.
On the menu, click “e-learning > Screen config of SCORM content > Completion Page” to display the “Configure SCORM Completion Page” screen.
click the “Use the page I customized.”.
Edit the source code of the page, and then click the “Update” button.
Note
The setting is reflected in all SCORM contents.
To create video content
The following is the procedure for creating video content
Log in with system manager, system administrator, or content registrant rights.
On the menu, click “e-learning > Video > Create” to display the video creation screen.
Select file that you want to register as video content, and click “Register” button.
Hint
You can select video content as content of e-learning on the e-learning creation screen or the e-learning editing screen.
Hint
You can embed video in other contents using “video” tag. (see To embed video in other contents)
Hint
If Thumbnail Display for Contents is activated, it is possible to specify thumbnails for video contents.(Reference: Re: Thumbnail Display for Contents )
If frames need to be specified for thumbnails, select ‘Specify video frames for thumbnails’, and input Frames Per Second (FPS) to be specified for thumbnails.
If image files need to be specified for thumbnails, thus specify by selecting ‘Specify the selected files for thumbnails’.
To display a list of video contents
THe following is the procedure to display a list of video content.
Log in with system manager, system administrator, or content registrant rights.
On the menu, click “e-learning > Video > Show list” to display the video list screen.
Note
For the system administrator and content registrant, only self-registered videos will be displayed in the list. For the system manager, all registered video will be displayed in the list.
To create multiple video contents
The following is the procedure for creating multiple video contents
Log in with system manager, system administrator, or content registrant rights.
On the menu, click “e-learning > Video > Create collectively” to display the multiple video creation screen.
Click “Add files” button to select files that you want to register as video contents (Multiple selection possible)
Click “Register” button to register the video contents.
Attention
If you fail to register video content, please register it again.
To update video content
The following is the procedure for updating video content
Log in with system manager, system administrator, or content registrant rights.
On the menu, click “e-learning > Video > List” to display the video list screen.
Click “Update file” of video, and select file that you want to update.
Click “Update video file” button.
Attention
When updating video contents, the progress of learners who are not incomplete the video will be initialized.
Hint
You can edit the title by clicking “Update title” of the video.
Hint
You can change the screen size by clicking “Update size” of the video.
Hint
If Thumbnail Display for Contents is activated, thumbnails can be specified for video contents. (Reference: Re: Thumbnail Display for Contents )
Click the link ‘Update Thumbnails’ for the videos in order to update the thumbnails.
Method for deleting a video content
Please find below the method for deleting a video content.
Log in with system manager, system administrator, or content registrant rights.
On the menu, click “e-learning > Video > List” to display the video list screen.
Click “Delete” link of video.
Please find below the method for collectively deleting video contents.
Please find below the procedure for collectively deleting video contents.
Log in as an operation manager, a system administrator, or a contents registrant.
Click ‘e-learning>Videos>View’ in the Menu in order to display a page of Videos List.
Select subject videos out of the list of videos. Click the link ‘Delete the selected videos’ in order to delete the videos collectively.
Attention
Once deleted, video contents data can be viewed again no longer. Once deleted, video contents can be resumed no longer.
To embed video in other contents
The following is the procedure for embedding video in other contents
Log in with system manager, system administrator, or content registrant rights.
On the menu, click “e-learning > Video > List” to display the video list screen.
Click “Video URL” link of video.
Embed the video in other contents (SCORM contents and HTML contents etc.) using the acquired URL.
Hint
You can embed the video in other contents by specifying the video URL in “src” attribute of the “video” tag.
Attention
Video embedded in contents can be viewed only when logged in.
To assign multiple video to e-learning
The following is the procedure for assigning multiple video to e-learning
Log in with system manager or system administrator rights.
On the menu, click “e-learning > Video > Bulk assignment to e-learning” to display the video assignment screen.
In [Select e-learning to assign to], select e-learning to assign video to.
In [Select video], select video to assign to e-learning. (Multiple selection possible)
Click “Register” button to assign video to e-learning.
How to allow simultaneous viewing of video content
Allowing simultaneous viewing of video content enables multiple users to view the video content at the same time.
The steps to allow simultaneous viewing of video content are as follows:
Log in with system administrator privileges.
Click on the menu “System management > e-learning settings > Content settings” to display the “Content settings” screen.
Select “Allow simultaneous viewing of video content” and choose “Yes”.
Click the “Update” button.
Hint
You can specify the video content for which simultaneous viewing is allowed in the e-learning creation/editing screen.
Hint
By entering information about the users who will be viewing the video content simultaneously during playback, the progress of the users who viewed the video content simultaneously will be updated according to the viewing status of that video content.