Managing users
To create a user
The following is the procedure for creating a user.
Log in with system administrator or class manager rights.
On the menu, click “System management > User > Create” to display the user registration input form.
Enter the details of the user and then click the “Go to confirmation screen” button to register them.
Check the user details and then click the “Create” button to register the user.
Hint
A single course request checker and a single course application proxy can be selected for each registered user. Perform the following procedure to specify the checker and proxy.
On the search input form, enter a keyword and then click the “Search” button to display a list of candidates.
On the list of candidates, select the target user. To specify the user as the checker click the “Specify as a checker” link. To specify the user as a proxy, click the “Specify a proxy” link.
To access user information
The following is the procedure for accessing user information.
Log in with system administrator or class manager rights.
On the menu, click “System management > User > Access” to display the user list.
On the search input form, you can enter a keyword and search options, and then click the “Search” button to narrow down the list of users.
Clicking the desired “User’s name” link on the user list will display detailed information about that user.
Hint
If you log in with class manager right, you can access only user you registered.
To access the courses being attended by a user
The following is the procedure for accessing the courses being attended by a user and the user’s course history.
Log in with system administrator or class manager rights.
On the menu, click “System management > User > Access” to display the user list.
On the search input form, you can enter a keyword and search options, and then click the “Search” button to narrow down the list of users.
On the user list, click the desired “User’s name” link to display detailed information about that user.
Scroll the detailed user information downwards to view the courses being attended by the user and the user’s course history.
Hint
If you log in with class manager right, you can access only the courses you manage.
To edit a user
The following is the procedure for editing a user.
Log in with system administrator or class manager rights.
On the menu, click “System management > User > Access” to display the user list.
On the user list, click the desired “User’s name” link to display detailed information about that user.
Click the “Edit user information” link to display the user editing form.
Make the changes you want and then click the “Apply” button to apply them.
To disable login for a single user
The following is the procedure for disabling login for a single user.
Log in with system administrator or class manager rights.
On the menu, click “System management > User > Access” to display the user list.
On the user list, click the desired “User’s name” link to display detailed information about that user.
Click the “Make login invalid” link to disable login for the user.
Hint
Disabling login for a user makes it impossible for that user to login. Re-enabling login for a user returns that user to their previous status.
To disable login for multiple users
The following is the procedure for disabling login for multiple users.
Log in with system administrator or class manager rights.
On the menu, click “System management > User > Access” to display the user list.
On the list of users, select the desired users and then click the “Make login unavailable for selected user” link to disable login for them.
Hint
Disabling login for a user makes it impossible for that user to login. Re-enabling login for a user returns that user to their previous status.
To enable login for a single user
The following is the procedure for enabling login for a single user.
Log in with system administrator or class manager rights.
On the menu, click “System management > User > Access” to display the user list.
On the user list, click the desired “User’s name” link to display detailed information about that user.
Click the “Make login valid” link to disable login for the user.
To batch process users
The following is the procedure for batch registration, editing, deleting, and login enable/disable of users using a CSV file.
Log in with system administrator or class manager rights.
On the menu, click “System management > User > Access” to display the user list.
Click the “Download list as CSV file” link to download the CSV file template.
Click “System management >Users>Collectively register users” on the menu. An entry form for batch processing will be displayed.
Edit the downloaded CSV file to create a batch file.
Click the “Browse” button and then select the CSV file you created.
Click the “Send” button to perform the batch process.
Hint
If you create a batch file that causes an error, an error message describing the problem will appear on the next page. Check the contents of the file and correct the problem, and then return to the previous page to re-register.
Hint
If you log in with class manager, you can edit only users you registered.
To delete a (one) user
The following is the procedure for deleting one user.
Log in with the rights of system administrator or class manager.
On the menu, click “System management > User > Access” in order to display a user list.
Click an intended “User’s name” link of the user list in order to display the user details.
Click the “Delete a user” link in order to delete the user.
Attention
No access to data of a deleted user will be permitted any longer. Once deleted, the user cannot be resumed.
To delete users collectively
The following is the procedure for collectively deleting users.
Log in with the rights of system administrator or class manager.
On the menu, click “System management > User > Access” in order to display a user list.
Select intended users from the user list. Click the “Delete selected users” link in order to delete the users collectively.
Attention
No access to data of deleted users will be permitted any longer.Once deleted, the users cannot be resumed.
To Add an Organization of Concurrent Service of User
The following is the procedure for adding an organization of concurrent service of user.
Log in with system administrator rights.
On the menu, click “System management > User> Access” to display a User List.
Click a subject “User name” link from the User List. View detailed information of a user.
Click the link “Update organization of concurrent service”. Display the page for updating an organization of concurrent service.
Select a subject organization from “Add organization of concurrent service”. Click the button “Add”.
Hint
If “Specify as organization leader” is ticked, a registration as a leader for organization of concurrent service will be made. A leader of organization of concurrent service can view progress statuses and learning histories of organization members, as an Organization Leader can.
Hint
If an organization added as the organization of concurrent service has been designated as a class implementation organization, a subject user will be added to learners for the class.
To Delete an Organization of Concurrent Service of User
The following is the procedure for deleting an organization of concurrent service of user.
Log in with system administrator rights.
On the menu, click “System management > User > Access” to display a User List.
Click a subject “User name” link from the list of users. View detailed information of a user.
Click the link “Update organization of concurrent service”. Display the page for updating an organization of concurrent service.
Tick “Cancel” for a subject organization in the “List of organizations of concurrent service”. Click the button “Update”.
Hint
If an organization deleted from organizations of concurrent service has been designated as a class implementation organization, a subject user will be deleted from learners for the class.
To Update Roles of Organization of Concurrent Service of User
The following is the procedure for updating roles of an organization of concurrent service of user.
Log in with system administrator rights.
On the menu, click “System management > User> Access” to display a User List.
Click a subject “User name” link from the list of users. View detailed information of a user.
Click the link “Update organization of concurrent service”. Display the page for updating an organization of concurrent service.
Tick or untick “Specify as organization leader” for a subject organization in the “List of organizations of concurrent service”. Click the button “Update”.
Hint
If “Specify as Organization Leader” is ticked, a change to a leader for organization of concurrent service will be made. If “Specify as Organization Leader “is unticked, a change to a member for organization of concurrent service will be made.
About user attribute
You can register attributes and attribute items that you need and assign them to users. In this system, such attributes are called “user attribute”, and items linked to user attributes are called “attribute type”.
To create a user attribute
The following is the procedure for creating a user attribute.
Log in with system administrator rights.
On the menu, click “System management > User attribute > Create” to display the user attribute registration form.
Enter the details of the user attribute and then click the “Create” button to register the user attribute.
To edit a user attribute
The following is the procedure for editing a user attribute.
Log in with system administrator rights.
On the menu, click “System management > User attribute > Access” to display the user attribute list.
On the user attribute list, click the desired “User attribute’s name” link to display detailed information about that user attribute.
Click the “Edit user attribute information” link to display the editing form.
Make the changes you want and then click the “Apply” button to apply them.
To delete user attribute
The following is the procedure for deleting a user attribute.
Log in with system administrator rights.
On the menu, click “System management > User attribute > Access” to display the user attribute list.
On the user attribute list, click the desired “User attribute’s name” link to display detailed information about that user attribute.
Click the “Delete this user attribute information” link to delete the user attribute.
Attention
If you delete the user attribute, the attribute type associated with the user attribute and the user attribute information registered for the user will be deleted.
Attention
A user attribute that has been specified for eligible class learners cannot be deleted.
To create a user attribute type
The following is the procedure for creating a user attribute type.
Log in with system administrator rights.
On the menu, click “System management > User attribute > Access” to display the user attribute list.
On the user attribute list, click the desired “User attribute’s name” link to display detailed information about that user attribute.
Click the “Add user attribute type” link to display the create form.
Enter the details of the user attribute type and then click the “Create” button to register the user attribute type.
To edit a user attribute type
The following is the procedure for editing a user attribute type.
Log in with system administrator rights.
On the menu, click “System management > User attribute > Access” to display the user attribute list.
On the user attribute list, click the desired “User attribute’s name” link to display detailed information about that user attribute.
On the user attribute type list, click the desired “User attribute type’s name” link to display the editing form.
Make the changes you want and then click the “Apply” button to apply them.
To delete a user attribute type
The following is the procedure for deleting a user attribute type.
Log in with system administrator rights.
On the menu, click “System management > User attribute > Access” to display the user attribute list.
On the user attribute list, click the desired “User attribute’s name” link to display detailed information about that user attribute.
On the user attribute type list, check the desired user attribute type and then click the “Delete selected user attribute types” link to delete them.
Attention
When you delete user attribute types, the settings of the user assigned to the user attribute type are reset.
Attention
A user attribute type that has been specified for eligible class learners cannot be deleted.
To process collectively user attributes or user attribute types
The following is the procedure to collectively register, change and delete user attributes and user attribute types in CSV files.
Log in as a system administrator.
On the menu, click “System management>User attribute>Collectively process” to display an input form for collective processing.
Prepare a CSV format file. Edit the input form in the CSV format file in order to create a collective processing file.
Click the button ‘Browse’ and select the CSV file that has been created.
Click the button ‘Send’ in order to perform a collective processing.
Hint
In a case where any error was committed during creating the collective processing file, reasons for the error will be displayed on the following page. Review and correct the file. Return to the previous page. Register again.
Hint
A CSV file downloadable on the user attribute list page can be used also as a collective processing file. (Corrections are needed as appropriate)
To assign user attributes to users
The following is the procedure to assign user attributes to users.
Log in as a system administrator.
On the menu, click “System management>Users>View” to display a user list.
Click the subject ‘User name’ link on the user list. View details of the user.
Click the “Assign user attributes” link in order to display a page for user attribute assignment.
Select user attribute types for each user attribute. Click the button ‘Apply’ in order to assign user attributes.
Attention
In a case where no user attributes have been registered, the “Assign user attributes” link will not appear.
To assign collectively user attributes to users
The following is the procedure to collectively register, change and delete user attributes assigned to users through the use of CSV files.
Log in as a system administrator.
On the menu, click “System management>User>Collectively assign user attributes” to display an input form for collective processing.
Click the subject ‘User name’ link on the user list. View details of the user.
Edit a CSV file in the format in order to create a collective processing file.
Click the button ‘Browse’ and select the CSV file that has been created.
Click the button ‘Send’ in order to perform a collective processing.
Attention
Do not specify user attribute types in a case where a user attribute assignment is cancelled.
Re: Career Paths
The Career Paths function is based upon registering career paths associated with e-learning courses, content items, and videos as well as career paths users aim for. The function helps users identify easily training courses, e-learning, content items, and videos suitable for them.
Hint
Go to ‘Operation Management > Various Types of Settings > Default conditions for search and display’ and set the option ‘Display recommendations’ to ‘Yes’ to display recommendations based upon career paths and attendance histories.
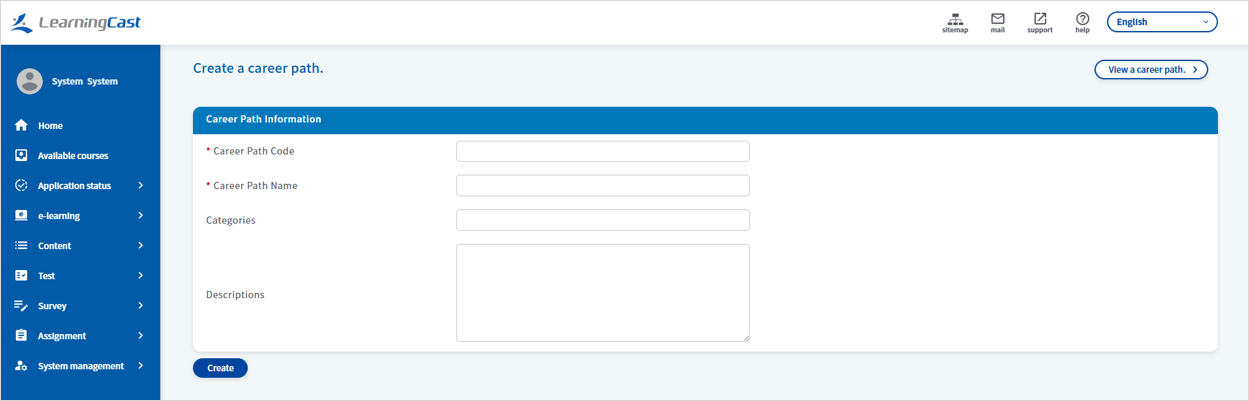
Method for Adding Career Paths
See below for the procedure for registering a career path.
Log in as system administrator.
Click ‘Operation Management > Career Paths > Register’ in the menu to display the career path registration form.
Type registration content and click the ‘Create’ button to register a career path.
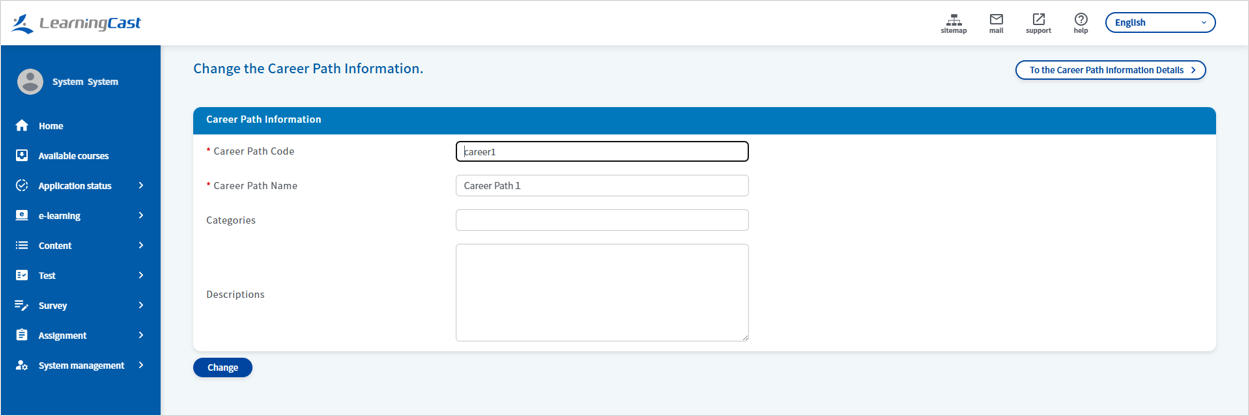
Method for Changing Career Paths
See below for the procedure for changing a career path.
Log in as system administrator.
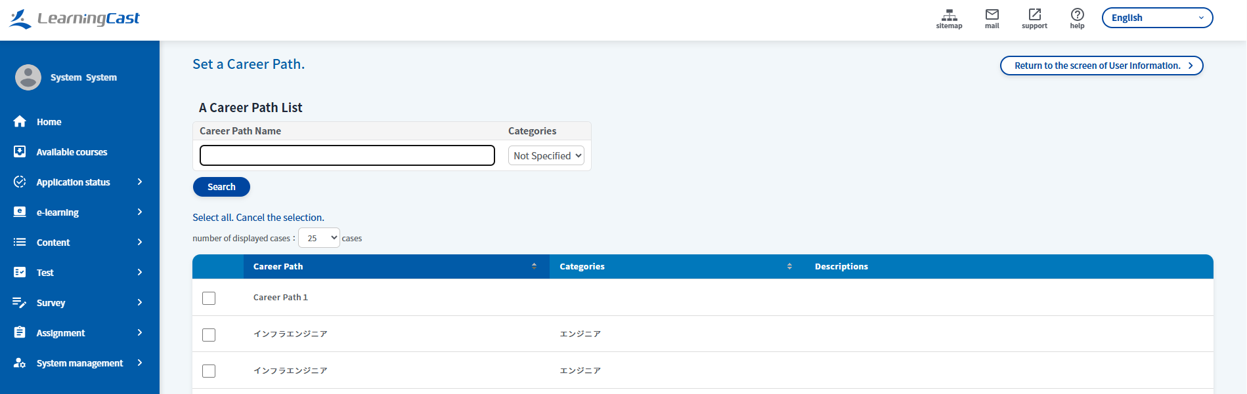
Click ‘Operation Management > Career Paths > View’ in the menu to display the career path list.
Click the subject ‘Career Path Name’ link in the career path list to view details of the career path.
Click the ‘Change career paths’ link to display the career path change form.
Type content of change and click the ‘Change’ button to change the career path.
Method for Deleting Career Paths
See below for the procedure for deleting a career path.
Log in as system administrator.
Click ‘Operation Management > Career Paths > View’ in the menu to display the career path list.
Click the subject ‘Career Path Name’ link in the career path list to view details of the career path.
Click the ‘Delete this career path information’ link to delete the career path.
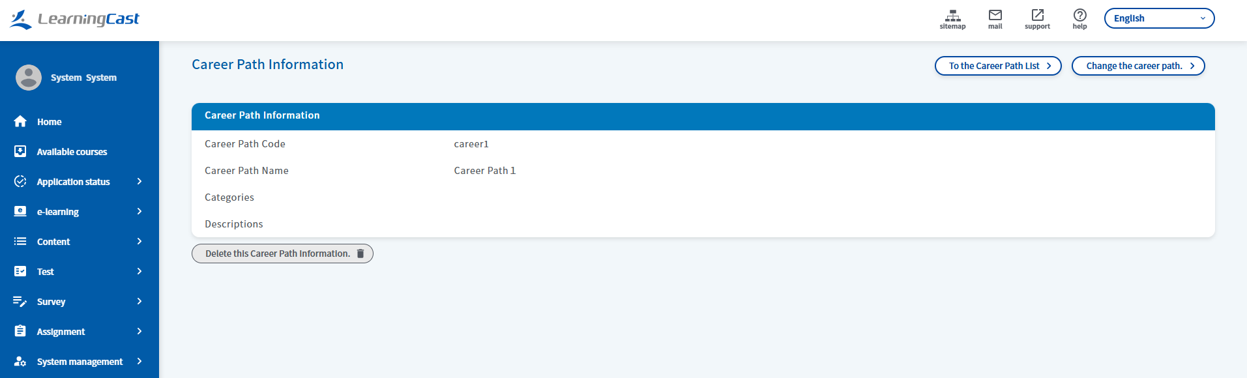
Attention
Deleting a career path will remove its information from any associated user information, e-learning and content items.
Method for Collectively Processing Career Paths
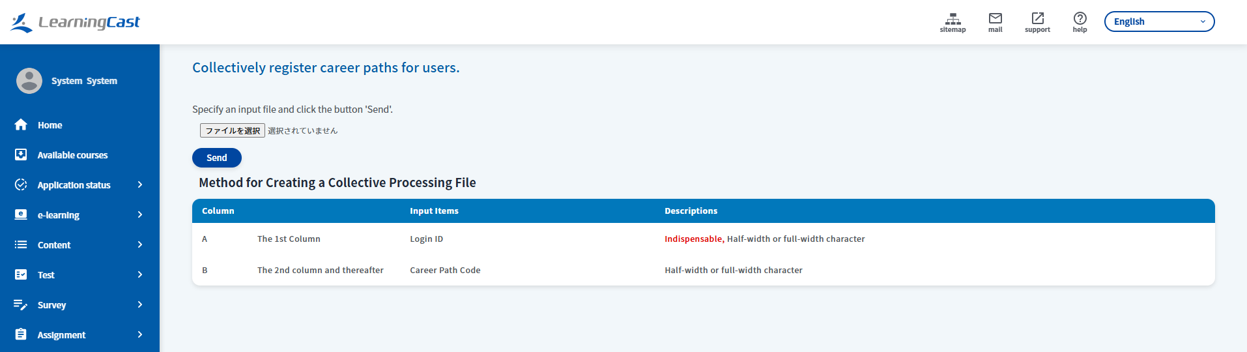
See below for the procedure for collectively registering, changing and deleting career paths via CSV.
Log in with privileges of system administrator.
Click ‘Operation Management > Career Paths > Collectively Process’ in the menu to display the batch processing input form.
Prepare and format a CSV file for batch processing.
Click the ‘Select a file’ button to choose the created CSV file.
Click the ‘Send’ button to perform the batch processing.
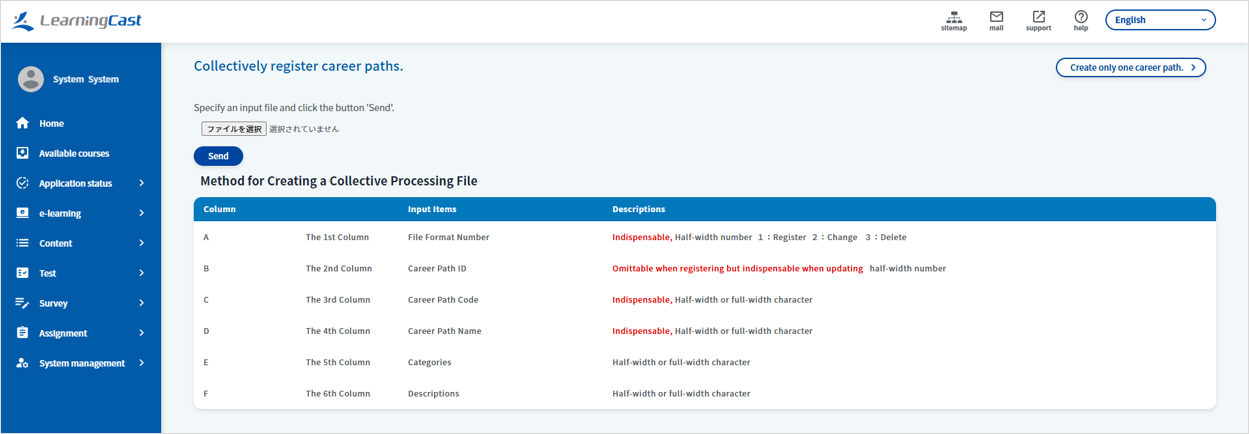
Hint
If there is any error in the process of making a file for collective processing, the error causes are indicated in the following page. Review and correct the content, and return to the previous page for re-registration.
Method for Assigning Career Paths to Users
See below for the procedure for assigning career paths to users.
Log in as system administrator.
Click ‘Operation Management > Users > View’ in the menu to display the user list.
Click the subject ‘User Name’ link in the user list to view details of the user.
Click the ‘Assign career paths to users’ link to display the page for assigning career paths.
Select a career path and click the ‘Set’ button to assign the career path.
Attention
When no career paths are registered, the ‘Assign career paths to users’ link will not be displayed.
Method for Collectively Assigning Career Paths to Users
See below for the procedure for collectively assigning, registering, changing, and deleting user career paths via CSV.
Log in with privileges of system administrator.
Click ‘Operation Management > Users > Collectively assign career paths to users’ in the menu to display the batch processing input form.
Prepare and format a CSV file for batch processing.
Click the ‘Select a file’ button to choose the created CSV file.
Click the ‘Send’ button to perform the batch processing.
Attention
Do not specify career path codes in order to delete any assigned career paths.